
Deploy a Landing Page with an AI Coding Agent on Cloudflare Pages
A practical guide to auditing a static website with an AI coding agent, approving Cloudflare access yourself, deploying the right folder with Wrangler, and checking the live site.

1. A working local page is the starting point
A landing page that works on your laptop still needs to be deployed before visitors can open it. This guide shows how to prepare the files with an AI coding agent, upload them to Cloudflare Pages, and verify the public result.
For a static landing page, you do not need to set up a traditional server. An agent with access to your project folder and terminal can inspect the files, identify the deployable output, run Cloudflare's Wrangler CLI, and help check the result. You still approve account access and decide when the site goes live.
This guide covers HTML, CSS, JavaScript, images, and fonts. If your page includes a database, login, server API, or a form that must actually deliver submissions, ask the agent to identify that behavior first. Uploading static files will not create a backend. A contact form that only looks functional in a preview will still only look functional after deployment.
2. Get the account, files, and agent ready
Before you begin, have these in place:
- A Cloudflare account you can sign in to yourself.
- Node.js and npm on the computer where the agent will run commands.
- The actual website project folder, including every image and font the page uses.
- An AI coding agent, such as Codex or Claude Code, that can read that folder and run terminal commands.
- A browser so you can approve login and inspect the deployed page.
The distinction between a project and a preview matters. If an AI tool only showed you a mockup in chat, export or save the real HTML, CSS, JavaScript, and assets first. The agent needs files it can inspect and a folder it can upload. Wrangler will be installed in the project later, after the folder audit.
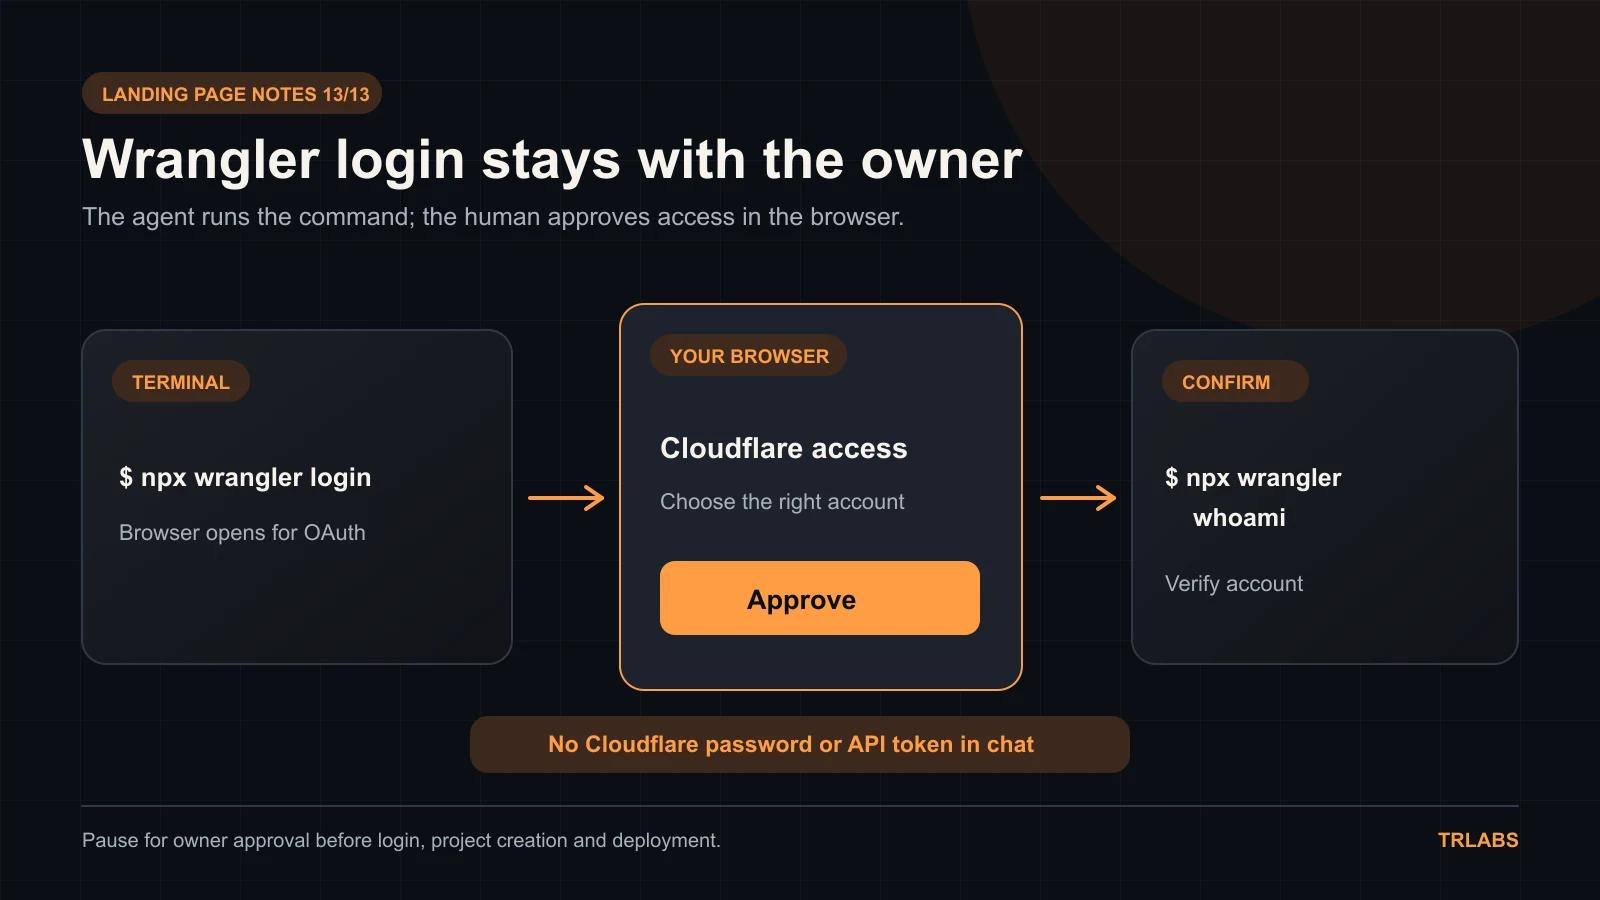
Keep your Cloudflare password and API tokens out of the agent chat. Wrangler opens a browser authorization flow, which you approve directly. If you manage several Cloudflare accounts, know which one should own the Pages project before starting.
3. Give the agent a clear job and a stopping point
Open the website folder in your coding agent. A useful first instruction is:
Audit this static website for Cloudflare Pages. Identify the deployable output folder, run any necessary build and local checks, and report broken paths, missing assets, secrets, or unfinished features. Show me the exact folder and proposed project name. Ask me before logging in, creating a Pages project, deploying, or changing a custom domain.
Ask for a short report before approving deployment. It should name the page entry point, the command used to build or test the site, the folder that would be uploaded, and any problems found. For a small vanilla project, that report might say public/index.html is the entry point and public is the output folder. For a project with a build tool, it might say npm run build creates dist/index.html.
Let the agent fix ordinary project issues inside the folder you provided, then review the result. A clear stop before login, project creation, upload, and domain changes gives you a chance to check the Cloudflare account, Pages project name, and public content. If it finds a secret, ask for the file path and the nature of the problem; the secret value does not need to be pasted into chat.
4. Audit the folder that will actually be uploaded
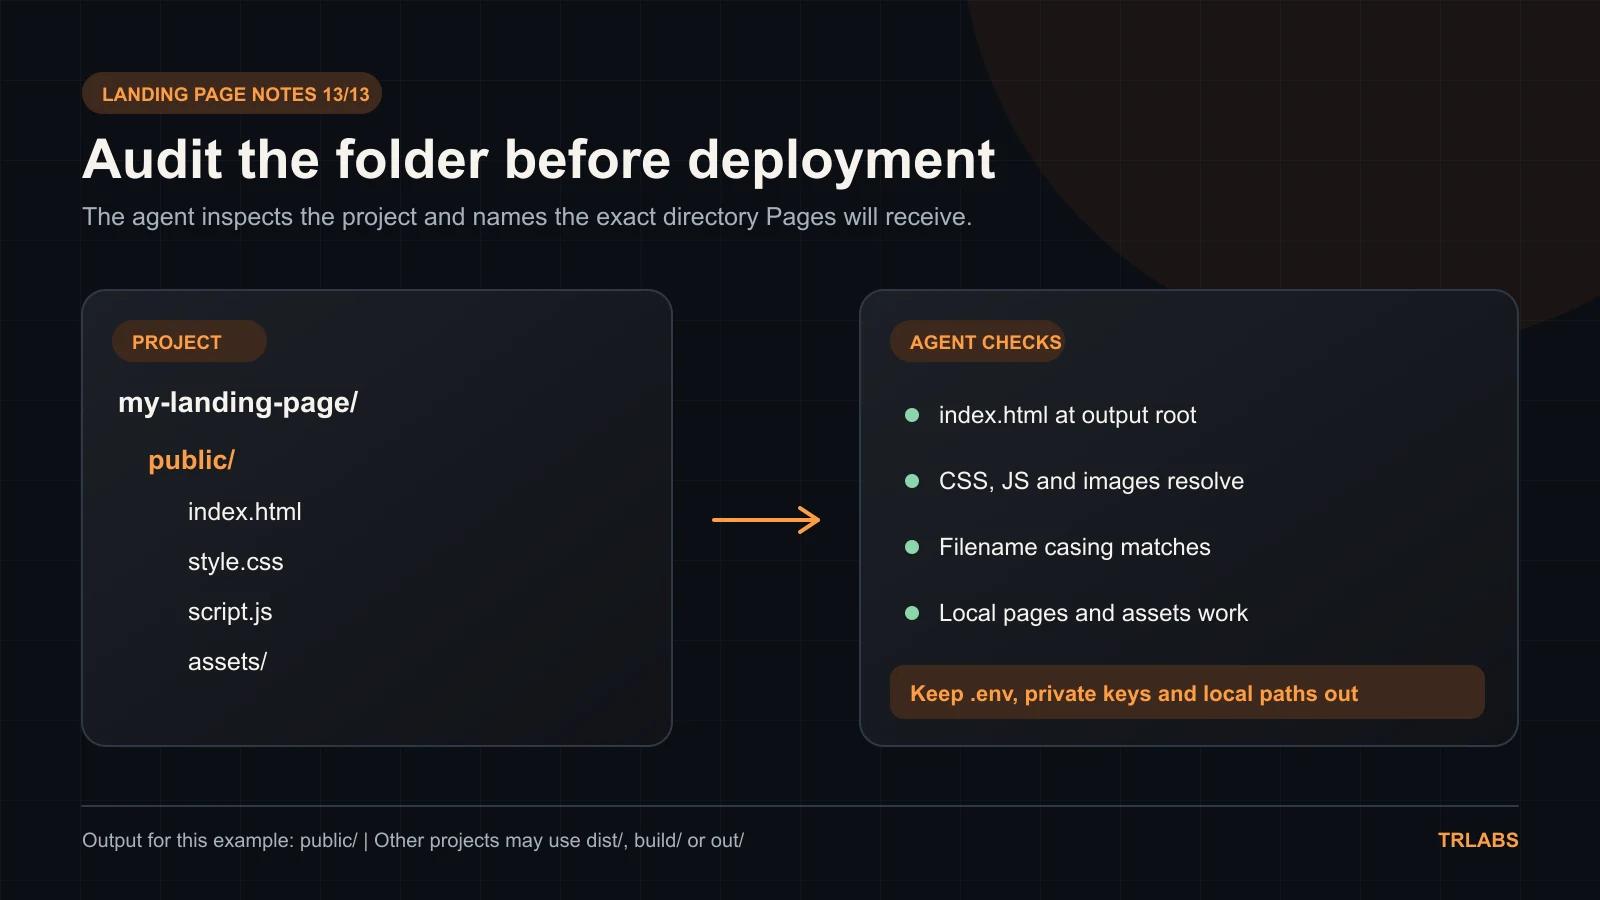
The deployable folder is the one Pages receives, not necessarily the folder you opened in the editor. Ask the agent to inspect it directly and confirm:
index.htmlexists at the root of the selected output folder.- Every CSS, JavaScript, image, and font URL points to a file that exists in that output.
- Filename capitalization matches the references.
Logo.svgandlogo.svgmay work differently after deployment. - No browser code refers to a computer-specific path such as
C:/Users/.... - No
.envfile, private key, database dump, or other private file is inside the public output. - Navigation, buttons, and other basic interactions work in a browser, including at mobile width.
- Placeholder copy, empty links, and forms with no real submission destination are identified before launch.
For a simple HTML/CSS/JS site, the output might be a public folder. If the project has a build command, have the agent run it and inspect the generated folder, often dist, build, or out. Do not choose a directory by name alone. It should contain index.html and all assets that page needs. If the build fails, fix the build before attempting a deploy.
For a site without a build step, you can serve the verified folder locally:
npx serve public
Replace public with the folder the agent verified. Open the local URL and click through the page. A file can look correct in an editor while an image path, script, or font fails in the browser. The same check is useful after a build: serve the generated output, not just the source files.
Pay particular attention to forms and keys. Anything shipped in browser JavaScript is visible to visitors, so a secret placed there is already public. A static form needs a real destination or service if you expect to receive submissions.
5. Install Wrangler and approve Cloudflare access
Once the folder is ready, install Wrangler in the project:
npm install --save-dev wrangler
If the folder has no package.json, the agent can initialize the npm project first. Installing Wrangler locally lets the project use a known CLI version, and npx runs that local version. Then start login:
npx wrangler login
Wrangler opens a Cloudflare authorization page in your browser. Sign in and approve access yourself. Do not send the agent your password or copy an authorization token into chat. After the browser flow completes, check the active identity:
npx wrangler whoami
Read the account information before continuing. A successful login only proves that Wrangler has access to an account; it does not prove that it is the account where you want this website. If the account is wrong, resolve that first and rerun the check.
6. Create a Pages project and deploy the verified output
This walkthrough uses Cloudflare Pages Direct Upload. Have the agent create the Pages project:
npx wrangler pages project create
Wrangler asks for a project name and a production branch. Check the proposed name before accepting it; it identifies the Pages project and affects its default pages.dev address. Keep a note of the final name, because the deploy command must target the same project.
Next, deploy the folder you verified in section 4:
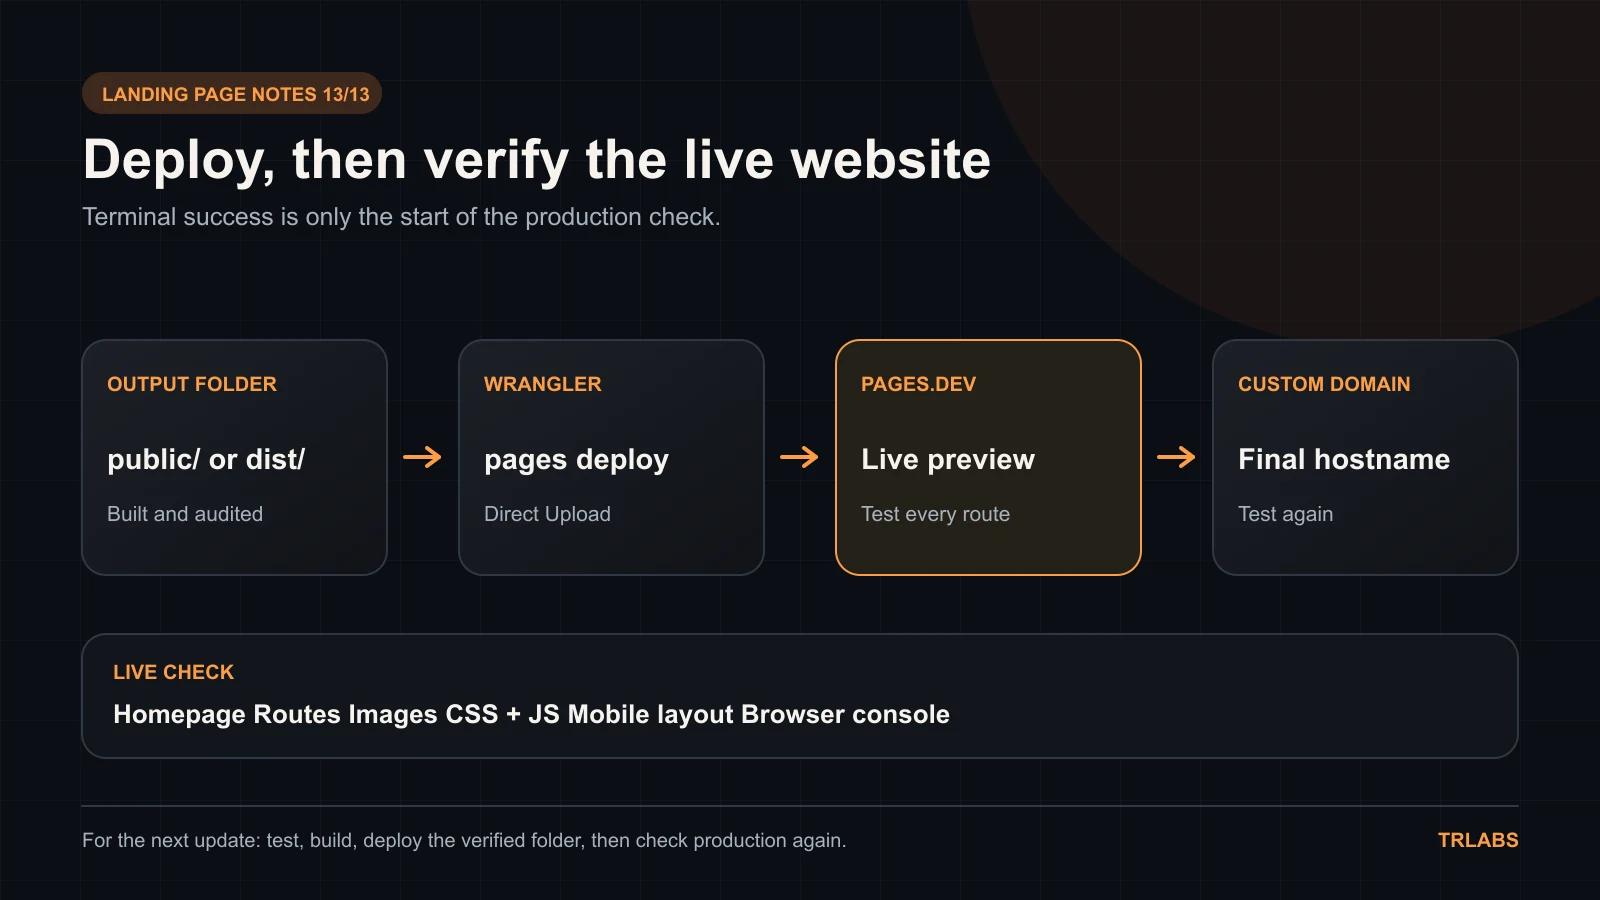
npx wrangler pages deploy public --project-name=your-project
Both public and your-project are examples. If the build produced dist, use dist; if it produced out, use out. Ask the agent to show the chosen path and a few files inside it immediately before upload. An upload can finish successfully even when the wrong folder was selected, leaving a broken or incomplete site at the URL.
Save the command that worked in the project notes. On a later update, the agent should run the build again if there is one, check the new output, deploy that output to the same Pages project, and test the new deployment.
7. Test the live site, then connect a domain
Wrangler returns a pages.dev URL after deployment. Open it in a browser and test the actual public site. A successful terminal message is only the beginning of verification:
- Load the homepage, then refresh it directly.
- Open each page or route that should be available, including by pasting its URL into a fresh tab.
- Check images, fonts, CSS, and JavaScript for missing files or 404 responses.
- Click navigation, buttons, and any other important interactions.
- Check a narrow mobile viewport for overflow or hidden content.
- Review the browser console for errors related to deployed files.
- Test any form end to end if it is supposed to receive submissions.
If the agent has a browser tool, ask it to open the live URL and report what it observed. Otherwise, perform the browser check yourself. A screenshot of the homepage alone does not verify the links, other pages, or submission flow.
Once the pages.dev site works, add your hostname under Custom domains in the Pages project and follow the DNS instructions shown there. Test the custom domain separately after it becomes active. A subdomain can generally use a CNAME at an external DNS provider; an apex domain must be a Cloudflare zone in the same account as the Pages project.
When something looks wrong, inspect the evidence in order. Broken styling or images often point to a missing output file, incorrect path, or capitalization mismatch. An older version can mean the latest deployment is not active, or the command targeted another project or account. Check the deployment shown in Cloudflare Pages before changing unrelated code.
For each later edit, repeat the same loop: make the change, build if needed, test the output locally, upload the correct folder, and check the live URL. A local change is not public until that deployment completes.
8. Choose how future updates will reach Pages
Direct Upload is a good fit when you want the agent to deploy a verified folder from your computer with Wrangler. If you want Cloudflare Pages to build and deploy automatically whenever you push to a connected repository, choose Git integration when you create the project.
Cloudflare does not let an existing Direct Upload Pages project switch to Git integration later. Moving to that workflow means creating another Pages project and planning the domain move. Decide how you expect to update the site before creating the first project.
The complete flow is straightforward: open the project in a coding agent, define its scope, audit the real output, approve Cloudflare access yourself, deploy through Wrangler, and verify the public site. The agent handles the commands and checks; you remain responsible for the account, content, and publication decision.